Monday, February 29, 2016

Recent Post Card Play

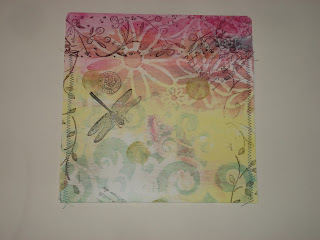
These two cards began when I wiped leftover acrylic paint off of my brush.  I added stencil flowers and ink stems which were taking forever to dry.  So, out came the clear embossing powder and the heat blower which solved that problem.

One of my mail art pals sent me "This Book Belongs To" stickers which I trimmed for the centerpieces of these two collages.  Imported hand-made papers and Magic Mesh were added for texture.

Some of the surplus shaving creme marbleized backgrounds (more information in older posts) seemed to be suitable backdrops for flowers and butterflies.


This post card has an acrylic paint background.

"Vintage" Chunky Cards & Sewn Little Booklets

The prompt for these brown "vintage" themed cards was a challenge by a mail art friend.  We both had to incorporate bag paper and newsprint.  I made extra, of course.  Postage to mail them out will be another matter.  Because there would be 3-D embellishments, I chose heavier paper than normal card stock.


After painting some book pages, I decided to fold them in half to make covers for little sewn booklets.

 They may need some rubber stamped images, some Washi tape, or  maybe a letter written inside.

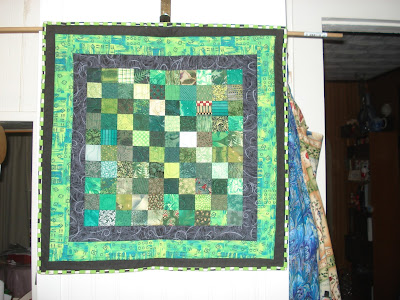
St. Patrick's Day Quilt

A while ago I made wall quilts to commemorate the first day of spring, Valentine's Day, St. Patrick's Day, September the eleventh, as well as many others.  These greens are more vibrant than than they appear in the picture below.

Saturday, February 20, 2016

Torn Paper Landscapes - First Attempts

For some strange reason I started with a black paper background instead of painting the sky with acrylic paint on white paper.  The marbleized papers are imported- hand-made, thick, fibrous, and tough to rip but interesting in texture. I finished five ATC's today:


This was my view at dusk after my art session.

Friday, February 19, 2016

Small Book From Business Envelopes

After watching a few YouTube presentations on turning envelopes into booklets, I started gathering long business reply envelopes.  Here are the steps I used to make this easy project:

I selected envelopes of similar length, although they can be trimmed- OR, mixed sizes can be used for uneven page edges.  It's good to seal the flaps shut.  If after any necessary trimming you have open tops or ends, you can either stitch, glue, tape or otherwise seal them, OR, tuck things into them as pockets.
 I folded each envelope about 2+1/4" in from one end.
Using white craft glue I attached the short portion of one envelope to the longer portion of another folded envelope.

 Next, I attached the units together to make one booklet.

And weighted it down to dry.  Acrylic paints covered any writing on the envelopes.  (A first layer of Gesso would cover any type.)  You can paint first and then glue, or glue first and then paint.  I painted the envelopes for the booklet (below) before I folded and glued.
This dotted pocket was made of scrap book paper, with the ends flapped out and glued to Page 1 and Page 2.
 These two flat bag-pockets I glued in as I was combining the envelope sections.
I used scrap book papers to cover the unpainted sides of the envelopes.  Collage would be nice.
Some pages, I over-stamped with images.
This books' dimensions are about 4+1/4" x 6" x 1/4" thick.  You can use more envelopes to make a thicker booklet, or use larger envelopes to end up with a bigger finished size.  I'm even thinking about trying this with large brown flat Kraft mailers, folded in half, or cut in half and folded again.

Gluing hand-made papers over two 4" x 6" cardboard pieces (wrapping the paper around to at least cover the inside edges) I glued the front cover to the first page and the back cover to the last page. I added a strip of paper over the folded page edges (spine), clamping/weighting it down and letting it dry. Tucked in some fancy fibers for bookmarks. Rubberstamped a large fern on the front cover with Versamark ink and sprinkled with gold embossing powder, melting the emboss with a heating gun.
Except for adding more collage or rubber stamped images, ascemic writing or a personal message, and tucking tags, stickers, teabags, Washi tape samples, photo's, etc. into the pockets, this book is finished.

IDEA:  fold-out add-on's would add interest, yes?  And for the very clever, pop-up's?  Or slide-out's?

Thursday, February 18, 2016

Putting One and One Together

After a shaving creme marbleizing session and making magazine picture transfers through stencils with clear packaging tape (see older blog posts), they seemed like "stand alone" pieces, but they needed something.  I introduced them to each other, using the transfers as overlays.  (Three are over acrylic paint backgrounds.)  Here are the results for your compatibility ratings:


WARNING: I only stored the transfers on waxed paper for two weeks.  Some came off quite easily, others were difficult to peel off, thus requiring tedious scraping.

Thursday, February 11, 2016

Two Side-Flap Envelopes

Acrylic paint has become my favorite go-to.  If I don't like the way the color turns out, I can just paint over it.  I can tell that my new spiral/dots stencil is going to be a lot of fun.  These brown kraft envelopes are much cheerier now that they are painted, rubber stamped, and stenciled.


Tuesday, February 9, 2016

More Bright Colors

These post cards started out being smooshed into orange acrylic paint, but I didn't like the color afterwards.  I mean, orange is a vibrant color, sometimes quite cheery and energizing, but- it's just not my color.  After staring at the orange post cards for several days it occurred to me to paint over them.

Instead of dragging out my Gelli Plate, I just dripped pink paint on some shiny-side-up freezer paper, spread it with a brayer, and then pressed the orange cards down onto the paint.  That was better.

Next, I spread some purple paint on the freezer paper, and pressed a rubber honeycomb (hot plate?) into the paint.  After I pressed the post cards onto this rubber stencil, I was left with a pleasing design.

Recent paper trimmings had some interesting color patterns and I couldn't bear to throw them out. So, I collaged some of the strips onto the background using matte gel  medium.  The finishing touch was plastic Magic Mesh squares in either pink or purple.  As a final coat I covered the cards with gloss gel medium.


Painting large sheets of smooth brown "construction" paper, I cut them in half and over-stamped. Then I folded those sheets in half and stitched up the sides.  Magic Mesh insisted on playing a border role.  I covered that with matte medium gel for extra adhesion.  The result?  Six more envelopes.


Saturday, February 6, 2016

Marbleized Post Cards Using Shaving Creme

Art frenzy here.  I think watching all of those YouTubes two days in a row flipped a switch.

Years ago I attempted this technique and had dismal results.  What I didn't know was that you have to scrape the foam off the paper after it has contacted the ink or paint.

So, you squirt some cheap foaming shaving creme on a flat waterproof surface, sprinkle ink dots over it, swirl with a pencil, and press your paper down to make complete contact.  Smooshing and moving the paper around gives different results.

Lift off the paper, scrape off the foam with a straight-edge plastic ruler or squeegee, dry with a paper towel if needed.  Done. Yesterday I tried it using rubber stamp inks.  It was a messy blast!  Here are some of the results before I decorate them:


Envelopes from Background Papers

After having a printing shop make good copies of my Background Paper pieces, I folded them twice, zig-zag stitched up the sides, and over-stamped to make six envelopes:


Envelope backs

And two note cards from the leftover edges